Helm 3: Top Five Improvements

Helm is a package manager for Kubernetes. One month ago the third major version was released and quite a few interesting changes took place. In this blog post, let me walk you through the five of them which I find the most crucial.
1. No Tiller
Helm finally got rid of its server component, Tiller. Now, it’s completely agentless. Tiller was this small application running on Kubernetes that listened for Helm commands and handled the real work of setting up Kubernetes resources.
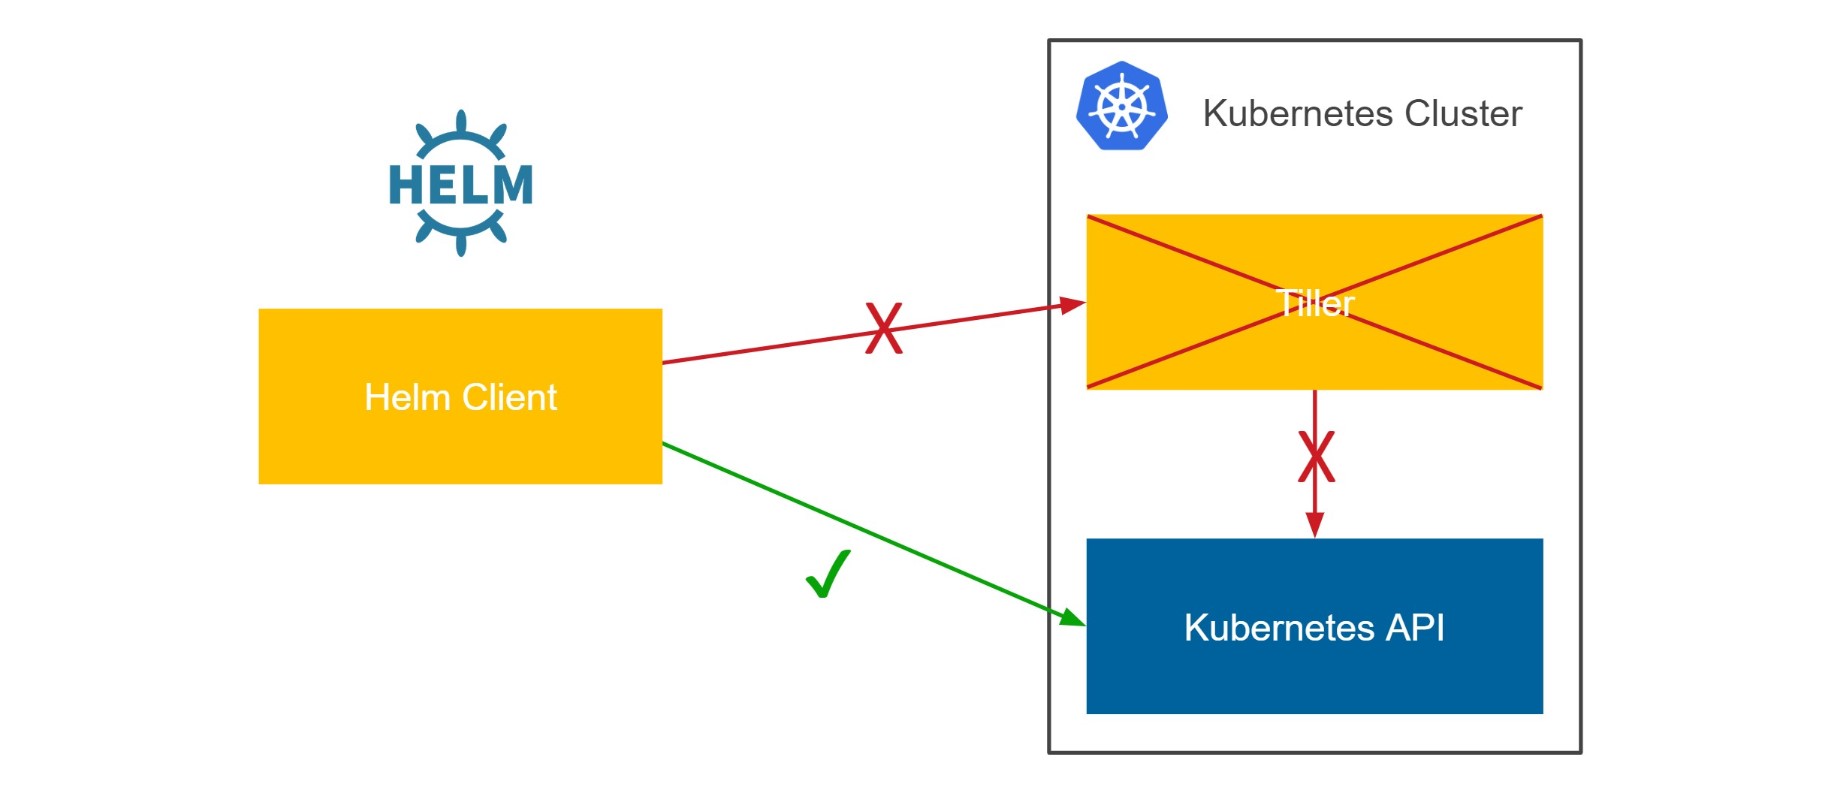
This change is definitely the biggest improvement in Helm 3. Why was Tiller an issue? First of all, Helm should be perceived only as a templating mechanism over Kubernetes configurations. So why the heck would you need some agent running on your server?!?
Tiller was also an issue, because it required cluster-admin ClusterRole for its creation. So, let’s say you want to run your Helm application on a Kubernetes cluster started in Google Cloud Platform. You start a new GKE cluster, you want to initialize Helm with helm init, and boom… it fails. That happens because, by default, you don’t have admin rights assigned to your kubectl context. Now you need to google for the magic command that assigns you admin rights and then, at this point, you already start wondering if Helm was really such a good choice.
Tiller was also an issue, because it used different access rights than what you had configured in your kubectl context. Therefore, you might have been able to create an application using Helm which you’d not be allowed to create with the use of kubectl. That smells like a security hole.
Luckily, when the whole Tiller is gone, Helm is a client-only tool. That fact has 3 important consequences:
- Helm uses the same access rights as defined in your
kubectlcontext - You don’t initialize Helm with
helm initanymore - Release names are now scoped to the namespace
Helm 3 is what it should always be, just a tool to perform operations on Kubernetes API. So now, if you can do something with the pure kubectl command, you are also allowed to do it with helm.
2. Distributed Repositories & Helm Hub
Helm command can install charts from remote repositories. Before Helm 3, it always used the predefined central repository, but you could also add other repositories. From now on, Helm moved its repository model from centralized to distributed. That means 2 critical changes:
- Predefined central repository was removed
- Helm Hub (platform for discovering distributed chart repositories) was added to
helm search
To understand it better, let me give you an example. Before Helm 3, if you wanted to install a Hazelcast cluster, you could execute the following command.
$ helm2 install --name my-release stable/hazelcast
Now, it wouldn’t work. You cannot install anything without adding a remote repository first. That’s because there is no longer one central and predefined repository. In order to install a Hazelcast cluster, you need first to add its repository and then install the chart.
$ helm3 repo add hazelcast https://hazelcast.github.io/charts/
$ helm3 repo update
$ helm3 install my-release hazelcast/hazelcast
The good news is that the Helm command is now able to look for charts directly in Helm Hub. For example, if you wanted to find in which repository you can find Hazelcast, you could do it by executing the following command.
$ helm3 search hub hazelcast
The command above lists all distributed repositories registered in Helm Hub which contains “hazelcast” in the chart name.
Let me ask you an interesting question. Is removing a central repository a progress or a regress? There are two perspectives. The first one is what it all means for chart maintainers. For example, we maintain Hazelcast Helm charts and each change meant propagating the same change to the central repository. This additional effort resulted in a fact that a lot of Helm charts were not well maintained in the central repository. The situation is similar to what we all experience with the Ubuntu/Debian package repositories. You can use the default repository, but it usually contains old package versions.
The second viewpoint is the perspective of chart’s users. For them, it’s actually slightly more difficult to install a chart now, but on the other hand, they can be sure that they install the up-to-date chart from the main repository.
3. JSON Schema Validation
Starting from Helm 3, chart maintainer can define JSON Schema for input values. This is an important improvement, because so far you could put anything you wanted in values.yaml and the installation may have ended up with incorrect results or some hard-to-read error messages.
For example, let’s say you’d give a string instead of a number for the port parameter. Then, you’d receive the following error.
$ helm2 install --name my-release --set service.port=string-name hazelcast/hazelcast
Error: release my-release failed: Service in version "v1" cannot be handled as a Service:
v1.Service.Spec: v1.ServiceSpec.Ports: []v1.ServicePort: v1.ServicePort.Port: readUint32:
unexpected character: �, error found in #10 byte of ...|","port":"wrong-name|..., bigger
context ...|fault"},"spec":{"ports":[{"name":"hzport","port":"wrong-name","protocol":
"TCP","targetPort":"hazelca|...
You have to admit it’s hard to analyze it and reason about the issue.
What’s more, Helm 3 added by default the validation against OpenAPI for Kubernetes objects, which means that requests sent to Kubernetes API are checked if they are really correct. This is a great benefit, especially for chart maintainers. We already discovered and fixed an issue we had in our Hazelcast Helm chart.
4. Helm Test
Helm test was slightly improved. Slightly, but it may actually encourage maintainers to write Helm tests and users to execute the helm test command after every chart installation. The thing is that before Helm 3, testing was somehow weird.
- Test was executed as a
Pod(as if it was supposed to be running all the time!); now you can define it as aJob(which makes much more sense) - Test Pods were not automatically removed (unless you used the magic flag
--cleanup), so by default, without any tricks, you couldn’t executehelm testmore than once for the given release; luckily, test resources (Pods, Jobs) are now automatically removed
I know that, after all, you could live with the old testing style and just use Pods and always execute helm test --cleanup, but you have to admit, these are all nice improvements!
5. Command-line Syntax
Last but not least, Helm command syntax changed a little bit. From the good side, in my opinion, all changes are for better. From the bad side, they are not backwards-compatible, so now when writing steps of how to install something using Helm, you always need to explicitly mention if the given command is for Helm 2 or for Helm 3!
For example, starting with helm install. Now, the release name is a mandatory parameter, while in Helm 2 you could skip it and the name would be auto-generated. To achieve the same in Helm 3, you need to add the parameter --generate-name. So, the standard installation using Helm 2 looked as follows:
$ helm2 install --name my-release hazelcast/hazelcast
While in Helm 3, you need to execute the following.
$ helm3 install my-release hazelcast/hazelcast
The change is small, the change is for better, but the change is also non-backward compatible.
The other very good change is that to delete your Helm release, you don’t have to add the --purge parameter. Simple helm uninstall <release-name> deletes all related resources.
There were some more minor changes. Some commands were renamed (and luckily aliased with old names), some others were removed (like helm init which is not needed anymore). You can read about all Helm command syntax changes here.
Conclusion
Well done Helm! The version 3 brings the Helm tool to the next level. As a user I love that Helm is now the client-only tool. As a chart maintainer, I love Helm Hub and the distributed-first repository approach. Keep on going and I hope we’ll see more interesting changes in the future!
You can read about all changes in Helm 3 at the official Helm page and in the related blog post from IBM.